Homemade soft pretzel rolls come together quickly with a few basic kitchen ingredients. For the best results, follow my step photos and detailed instructions. You’ll love this dinner version of soft pretzels!
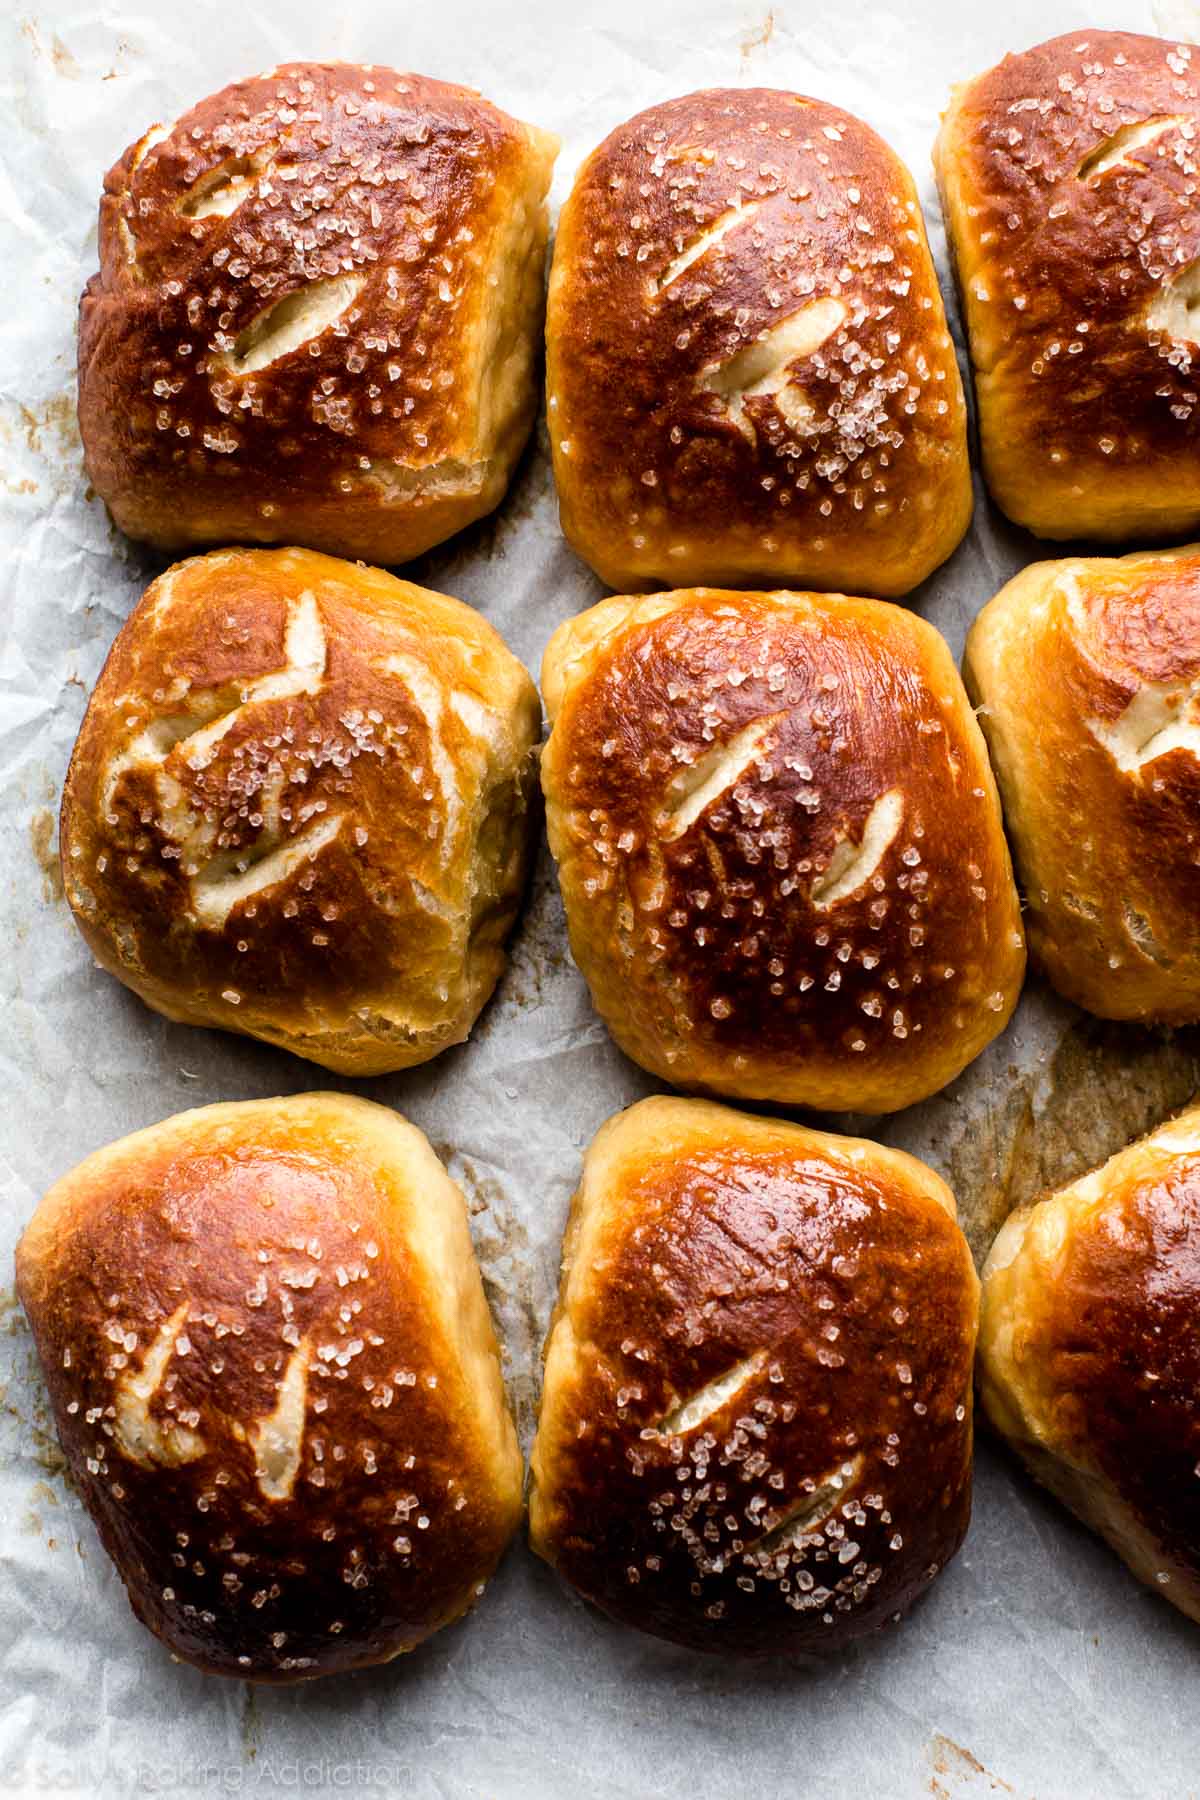
Meet soft pretzel rolls, the mealtime-appropriate version of soft pretzels. Instead of shaping the dough into traditional pretzels, we simply craft the dough into balls. Like soft pretzel bites, but bigger! I know we all like the sounds of that. There’s a lot to cover today so let’s dive right in.
These Soft Pretzel Rolls Are:
- Made with 7 basic ingredients
- Extra chewy
- Soft and fluffy in the centers
- Easier than you think
- Loaded with real pretzel flavor
- Topped with crunchy coarse salt
- Baked to golden brown perfection
Behind the Recipe
Are you familiar with my soft pretzels recipe? It’s a completely un-intimidating approach to making pretzels from scratch. If you have zero skill in the kitchen, you can make homemade soft pretzels. I even turned this recipe into soft pretzel knots and jalapeño cheddar soft pretzels, too. But for soft pretzel rolls, we skip the twisting/shaping and form the dough into balls. Much easier.
To make soft pretzel rolls, we use the exact same dough that we use to make soft pretzels. This simple dough comes together with incredibly basic ingredients like water, yeast, butter, brown sugar, salt, and flour. Separate, they’re awesome. Together? Soft pretzels!
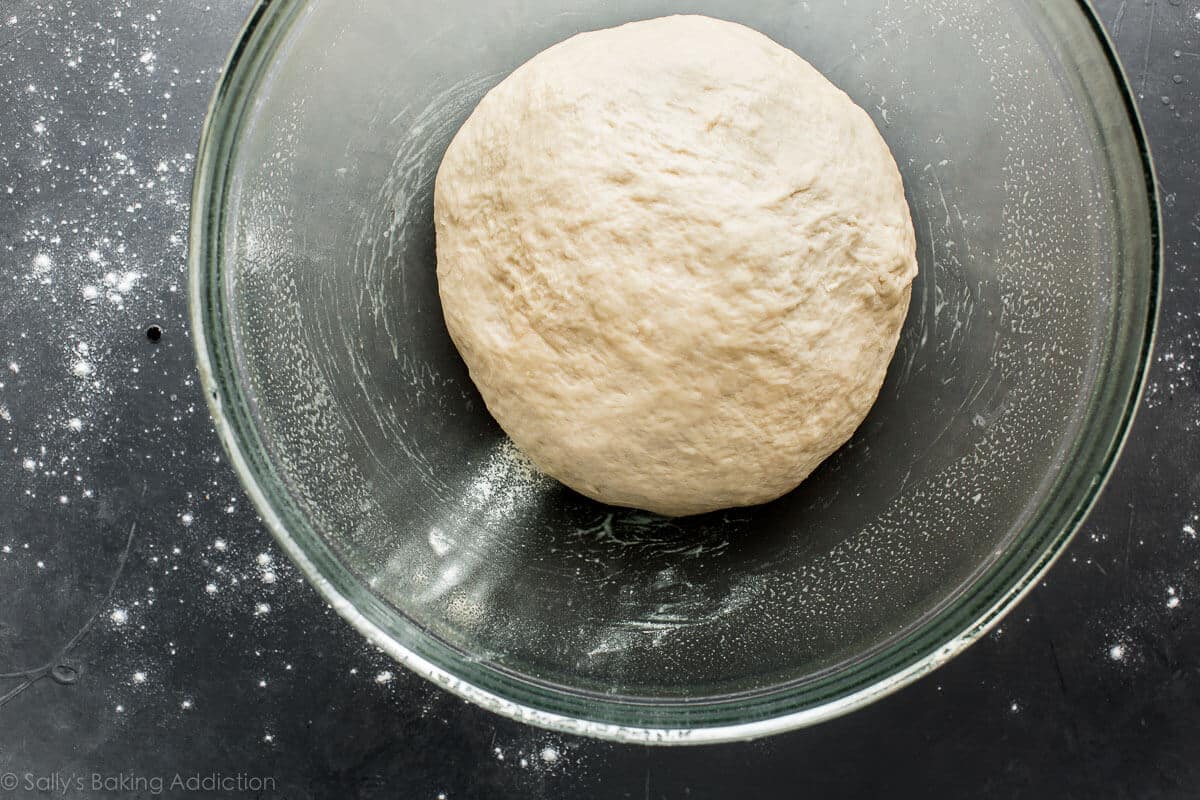
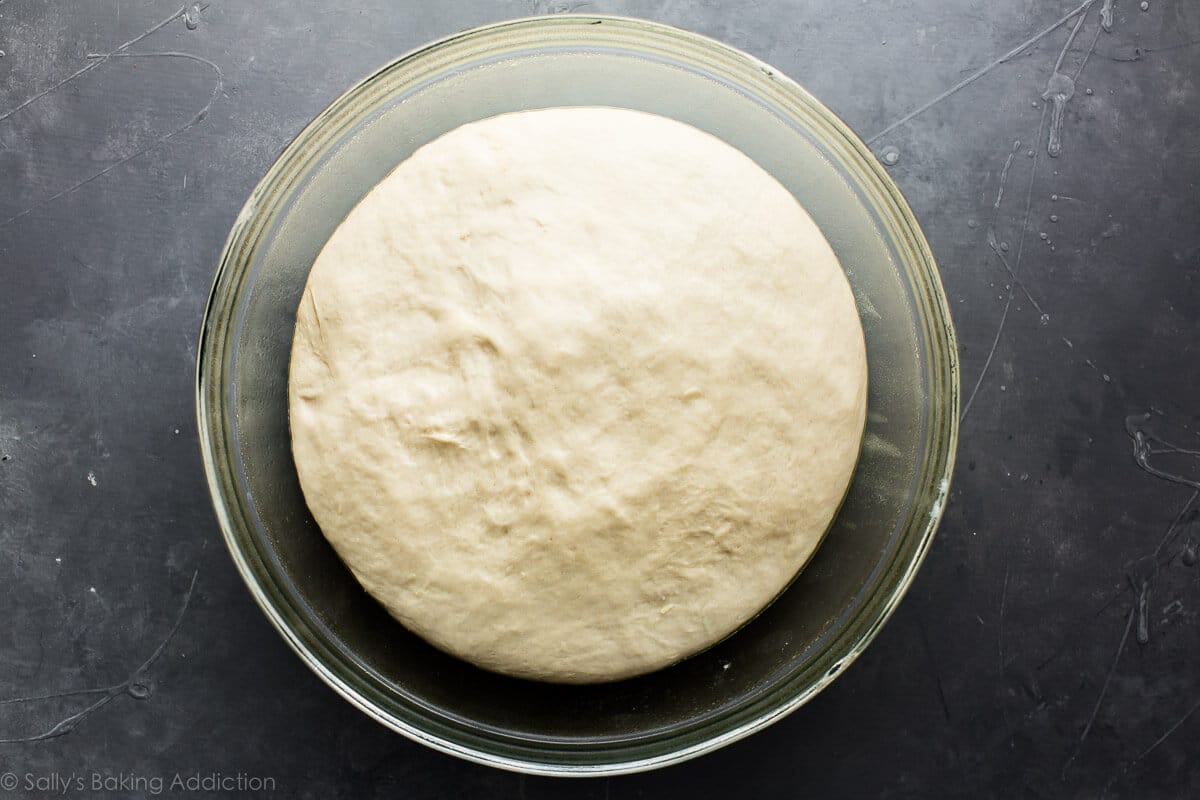
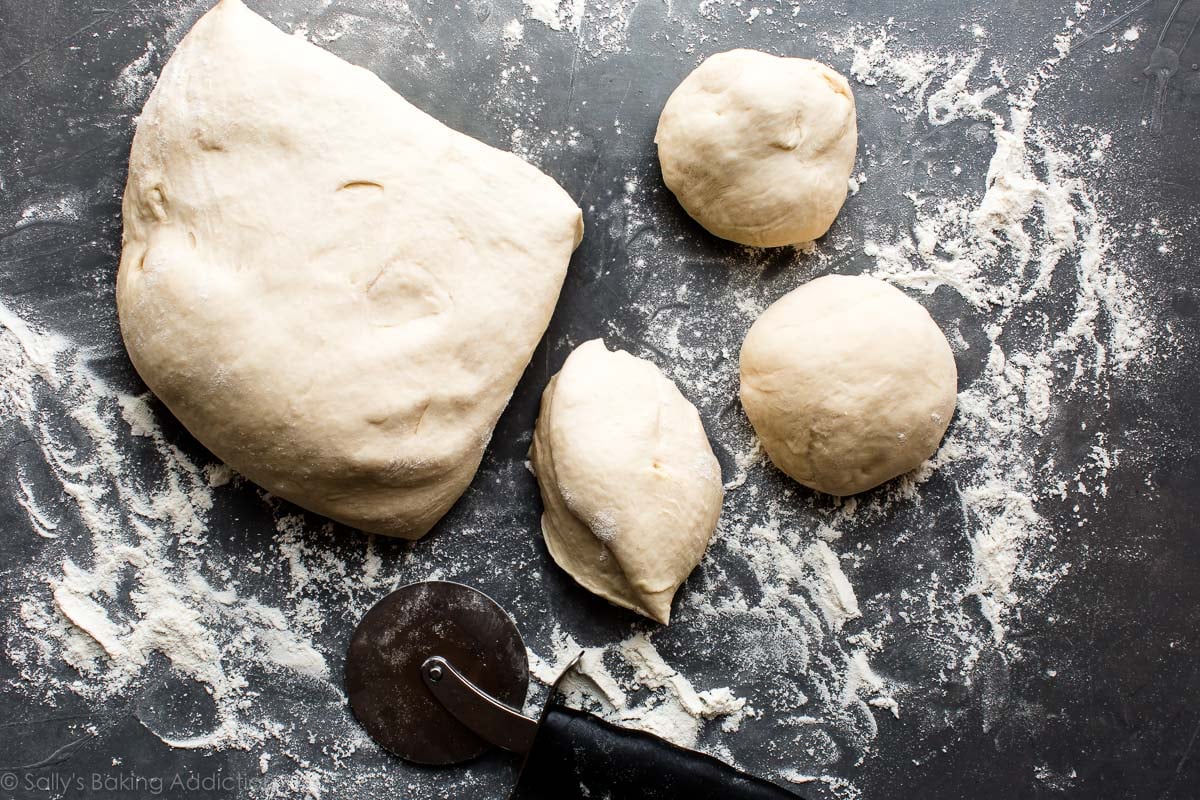
The primary difference between the two is that today’s rolls require a little extra rise time. We want the rolls to be fluffier than regular soft pretzels, so we give the dough a few extra minutes to rest—it’ll nearly double in size. See the photo of dough above and the one right below? There’s about 1 hour between the two photos—some great rise there.
Overview: How to Make Soft Pretzel Rolls
- Make the dough. See my How to Knead Dough video tutorial if you need extra help with that step.
- Let the dough rise for an hour. Or until doubled in size, as pictured above.
- Punch down the dough. This helps get rid of any air bubbles.
- Divide the dough to form the rolls. Aim for roughly 1/3 cup of dough each, which will yield about 12 rolls. Shape into balls.
- Give the rolls a baking soda bath. See below for more details.
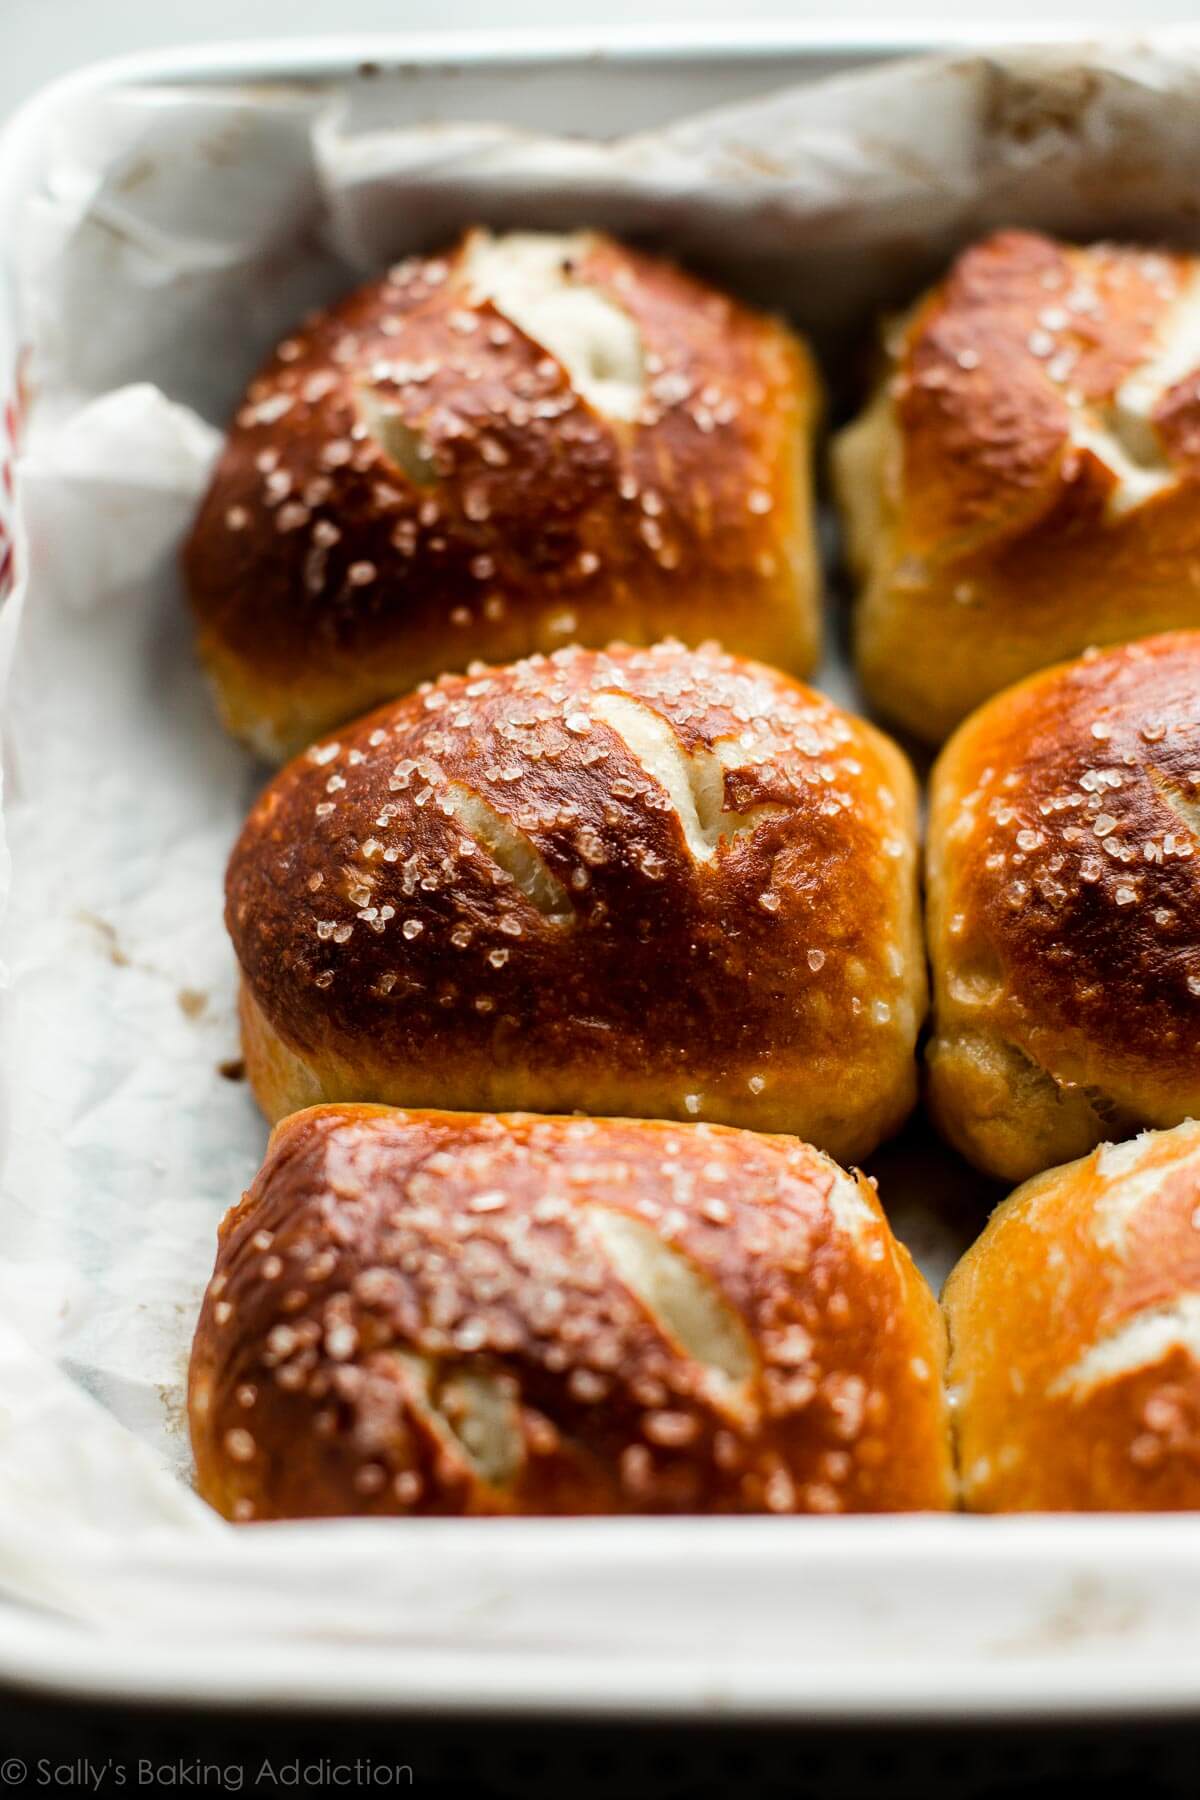
- Place rolls into prepared baking pan. I like to bake the rolls squished together in a baking pan because they hold their shape much better. You can, however, separate them on a large baking sheet.
- Score the tops of each roll & top with butter and salt.
- Bake until golden brown.

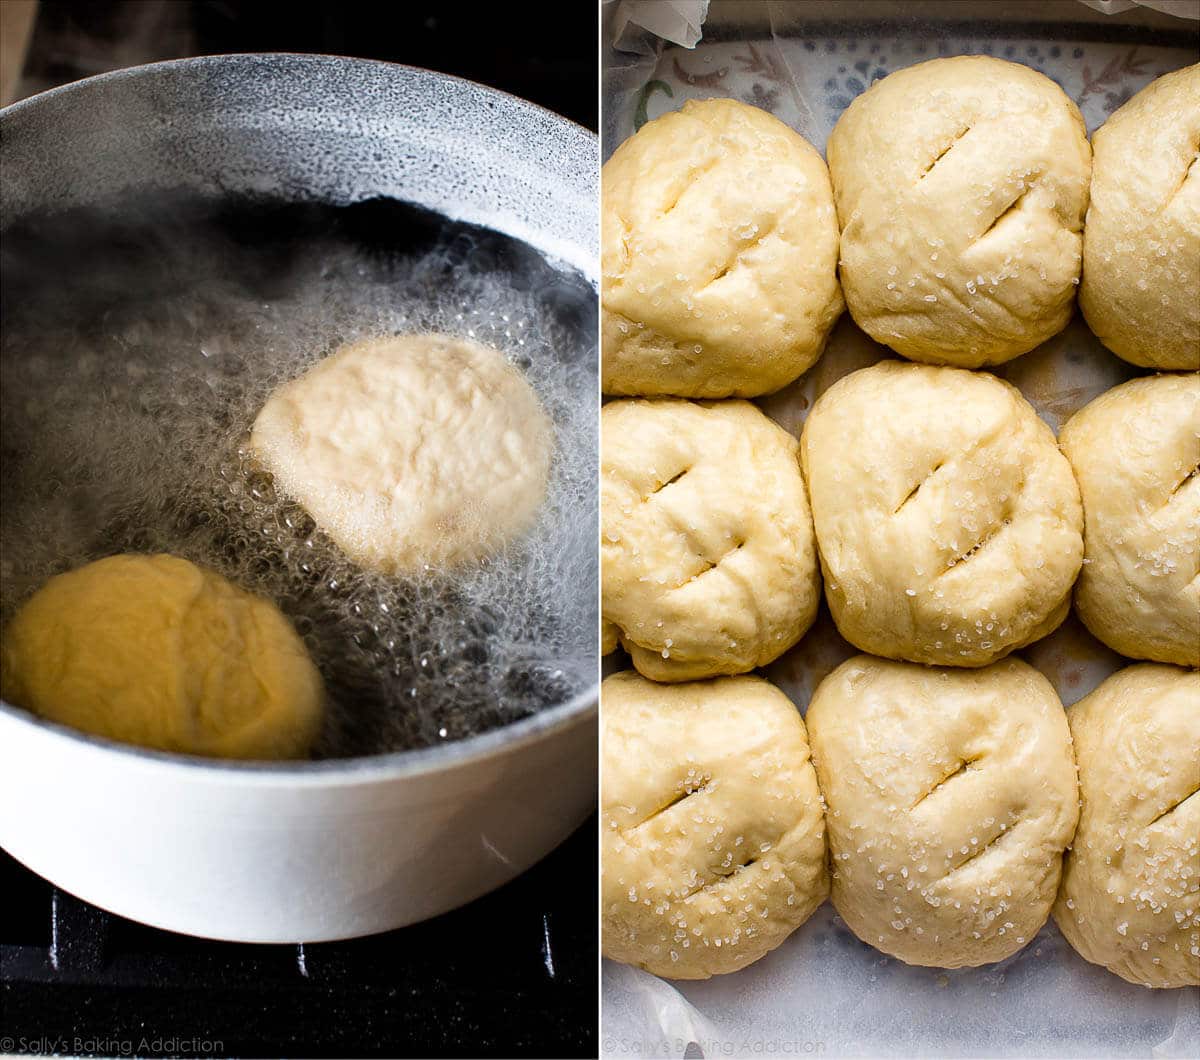
Baking Soda Bath
Each step is important but the baking soda bath is imperative. Why? It’s what gives pretzels that iconic flavor and chewy exterior, plus it locks in the super soft center and helps deepen the golden brown color on the exterior. Save time and get the water boiling as you’re shaping the dough into balls. Then drop each dough ball into the boiling water + baking soda for a quick soak. Worth it!
The rolls look wrinkly after boiling but if foods like sloppy joes + baked beans + messy casseroles teach us anything about life, it’s this: appearances can be pretty deceiving. Soon enough, those pale wrinkly buns will transform into buttery + salty + golden brown carbs.
3 Success Tips for Homemade Pretzel Rolls
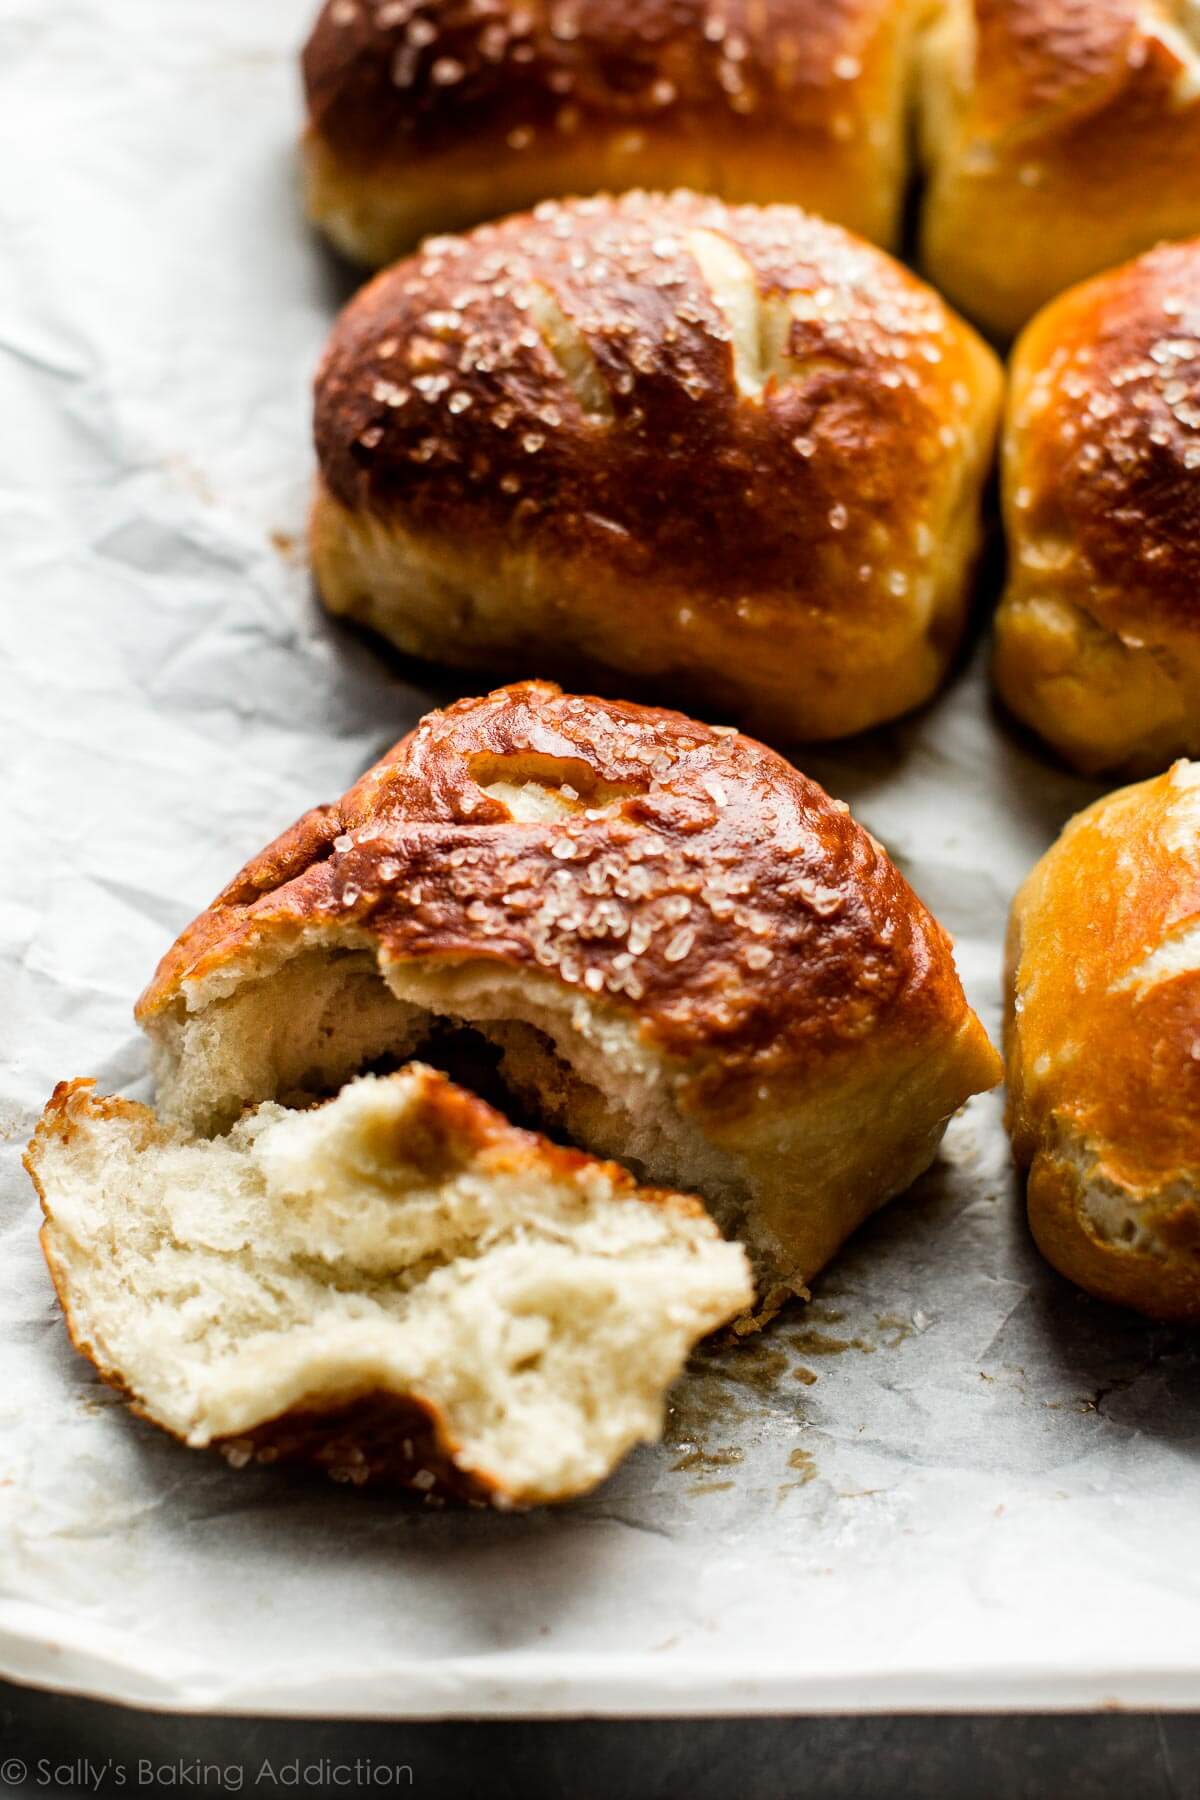
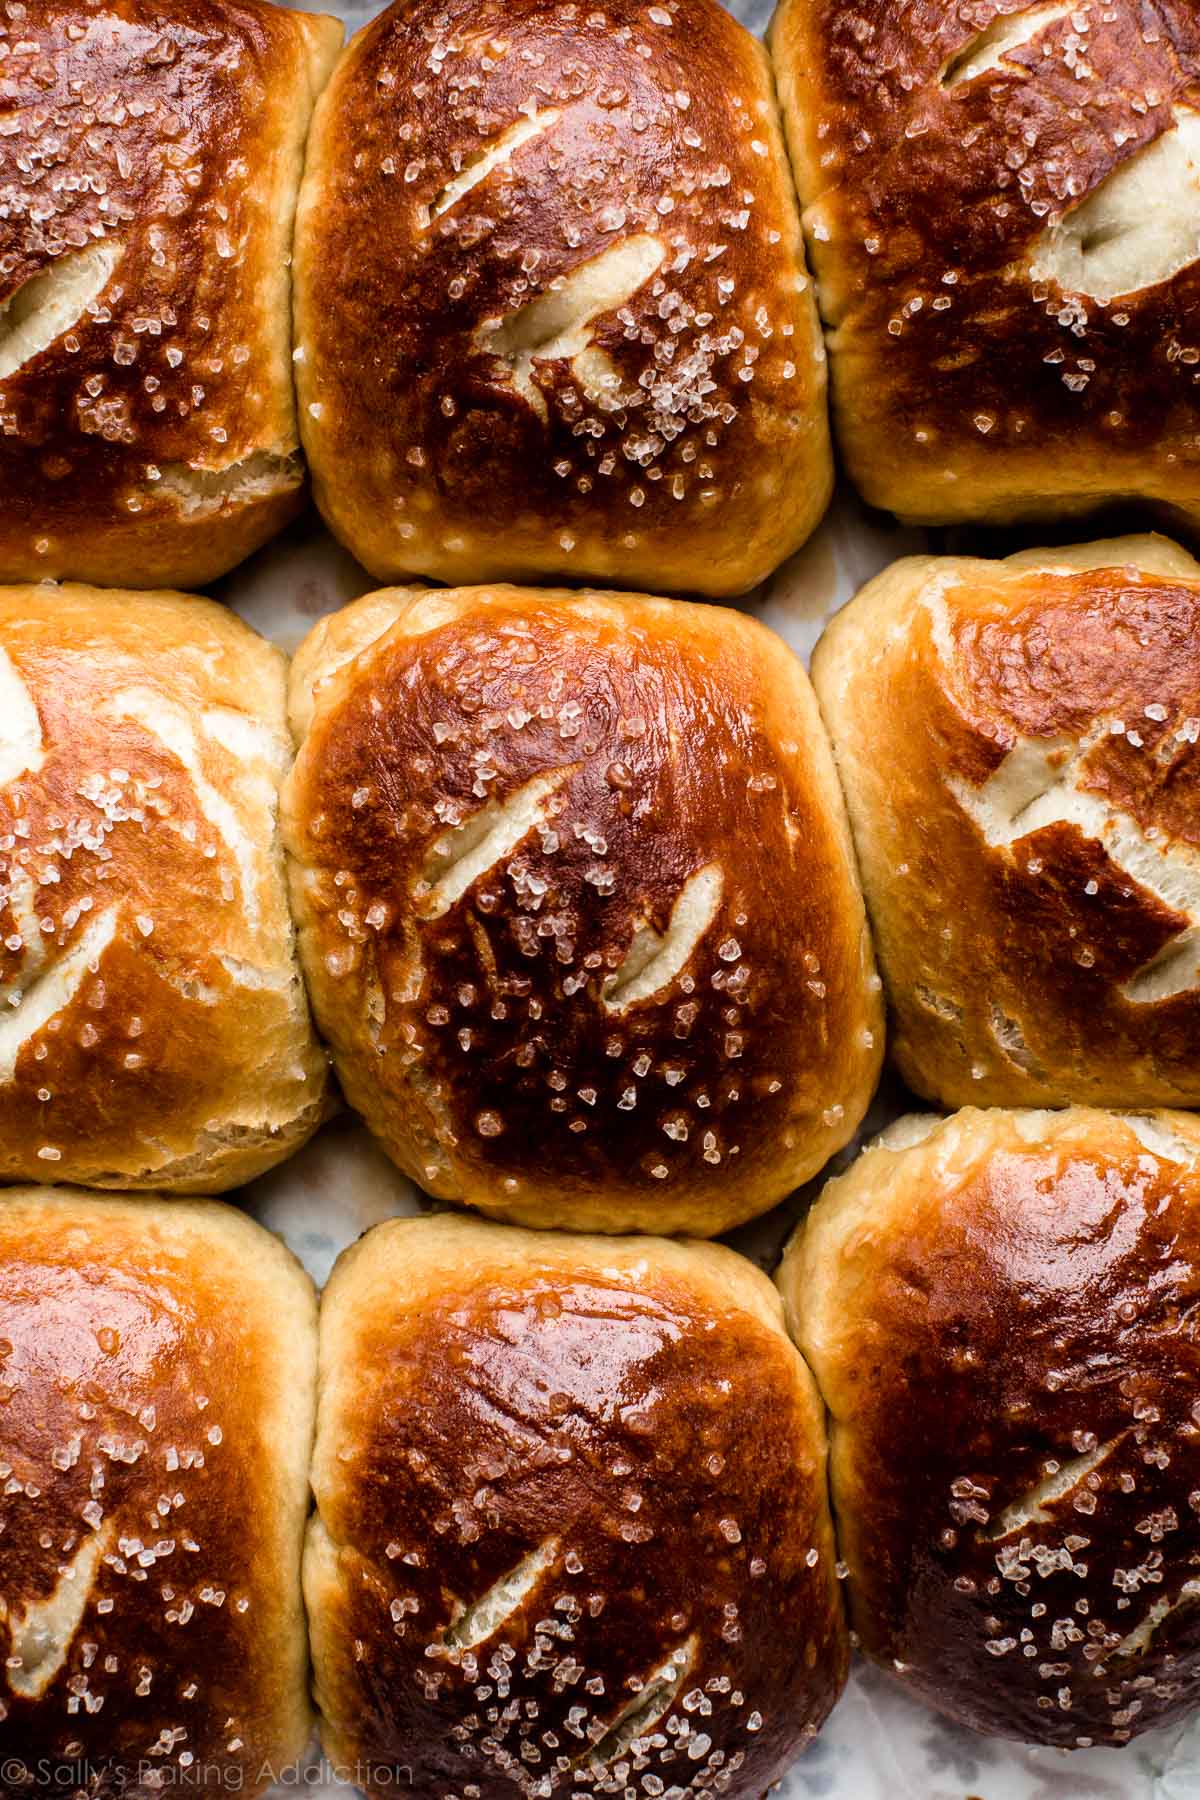
- Score the tops of the rolls. Use a sharp knife to do this once the rolls come out of the baking soda bath. Scoring the tops allows the rolls to expand and the centers to cook all the way through since they’re thicker rolls.
- Brush with melted butter and sprinkle with sea salt. This gives the rolls that delicious bakery-style flavor.
- Bake until golden brown. The deeper the color, the better the flavor.
The most delicious ways to eat these pretzel rolls? Enjoy them with beer cheese dip or bacon spinach dip, as buns for ham & swiss sandwiches, with soup (like minestrone soup or creamy chicken noodle soup), as a side with walnut crusted chicken, with the topping from crab pretzels, or straight from the pan. They’re big, soft, fluffy, and pretzel-y!
Print
Easy Pretzel Rolls
- Prep Time: 1 hour, 30 minutes
- Cook Time: 25 minutes
- Total Time: 2 hours
- Yield: 12 rolls
- Category: Bread
- Method: Baking
- Cuisine: American
Description
Making easy pretzel rolls from scratch is simpler than you think. Follow this easy and approachable way to baking them at home!
Ingredients
- 1 and 1/2 cups (360ml) warm water (lukewarm—no need to take temperature but around 100°F (38°C) is great)
- 2 and 1/4 teaspoons (7g) instant or active dry yeast (1 standard packet)
- 1/4 cup (4 Tablespoons; 56g) unsalted butter, divided
- 1 teaspoon salt
- 1 Tablespoon brown sugar
- 3 and 3/4 – 4 cups (469-500g) all-purpose flour (spooned & leveled), plus more for work surface
- coarse sea salt for sprinkling
Baking Soda Bath
- 1/2 cup (120g) baking soda
- 9 cups (2,160ml) water
Instructions
- Whisk yeast and warm water together. Allow to sit for 1 minute. Meanwhile, melt 1 Tablespoon of butter (reserve the rest for step 6). Whisk in salt, brown sugar, and melted butter. Slowly add 3 cups of flour, 1 cup at a time. Mix with a wooden spoon or dough hook attached to stand mixer until dough is thick. Add 3/4 cup more flour until the dough is no longer sticky. If it is still sticky, add 1/4 – 1/2 cup more, as needed. Poke the dough with your finger—if it bounces back, it is ready to knead.
- Knead the dough: Keep the dough in the mixer and beat for an additional 5 full minutes, or knead by hand on a lightly floured surface for 5 full minutes. (If you’re new to bread-baking, my How to Knead Dough video tutorial can help here.) If the dough becomes too sticky during the kneading process, sprinkle 1 teaspoon of flour at a time on the dough or on the work surface/in the bowl to make a soft, slightly tacky dough. Do not add more flour than you need because you do not want a dry dough. After kneading, the dough should still feel a little soft. Poke it with your finger—if it slowly bounces back, your dough is ready to rise. You can also do a “windowpane test” to see if your dough has been kneaded long enough: tear off a small (roughly golfball-size) piece of dough and gently stretch it out until it’s thin enough for light to pass through it. Hold it up to a window or light. Does light pass through the stretched dough without the dough tearing first? If so, your dough has been kneaded long enough and is ready to rise. If not, keep kneading until it passes the windowpane test.
- Rise: Place in a large greased bowl, cover tightly with plastic wrap, and allow to rise in a warm environment for 1 hour or until nearly doubled in size. (Tip: I preheat my oven to 200°F (93°C), turn it off, place the dough inside and shut the oven. This is the warm environment.)
- Once risen, punch dough down to release any air bubbles. Turn out onto a lightly floured surface and, with a sharp knife or pizza cutter, cut dough into 1/3 cup sections. You should have about 12. Shape into balls.
- Preheat oven to 400°F (204°C). Line 2 baking sheets with parchment paper or silicone baking mats OR line a 9×13 baking pan (I use a baking pan.) Set aside.
- Bring baking soda and 9 cups of water to a boil in a large pot. Drop 1-2 pretzel rolls into the boiling water for 20-30 seconds. Any more than that and your pretzels will have a metallic taste. Using a slotted spatula, lift the pretzel roll out of the water and allow as much of the excess water to drip off. Place pretzel rolls onto prepared baking sheet or close together in the baking pan. Using a sharp knife, score a couple slits into the top of each.
- Melt the remaining butter. Lightly brush each roll with melted butter and sprinkle with coarse sea salt.
- Bake for 22-26 minutes or until a deep golden brown on all sides.
- Remove from the oven and serve warm. Pretzel rolls may be stored in an airtight container or zipped top bag for up to 3 days (they lose a little softness).
Notes
- Make Ahead Instructions: Pretzel rolls freeze well, up to 2 months. To reheat, bake frozen pretzel rolls at 350°F (177°C) for 20 minutes or until warmed through or microwave until warm. The prepared pretzel dough can be refrigerated for up to one day or frozen in an airtight container for 2-3 months. Thaw frozen dough in the refrigerator overnight. Bring to room temperature, then allow to rise and continue with step 3.
- Special Tools (affiliate links): Stand Mixer or Glass Mixing Bowl and Wooden Spoon | Baking Sheets | Silicone Baking Mats or Parchment Paper | Large Pot | Slotted Spatula | Pastry Brush
- Reference my Baking with Yeast Guide for answers to common yeast FAQs.


Such a good and easy recipe!! I used a lot more flour than it needed and it turned out beautiful.
This recipe was quite easy to follow. I did what you mentioned in terms of preheating the oven at 200, turning it off and putting the tightly-covered bowl with the dough in to rise in the “warm environment”, but the top surface of the dough was quite dry when I took it out to shape it and after baking the buns were quite dense. I wanted them as hot dog buns, but that didn’t work. Do you know what I did wrong? Maybe I had added too much flour? I’d like to try this again. Either way, the taste was great, so thanks a lot for the recipe!
Hi Homa, They’re supposed to be on the denser side, closer to pretzels. So glad you enjoyed the taste!
Thanks a lot for the clarification, Michelle!
Hi, Sally. My hands are not strong enough to knead dough, I always make my breads in my bread machine. Can you suggest a time to knead this dough either in my Zojirushi bread machine, or my Kitchen Aid mixer? Thank you!
Hi Janet! You can knead the dough in your Kitchen Aid mixer with a dough hook for 3 minutes instead.
Thank you so much!
These were easy and delicious!! And super fun. I’ll definitely make these again!
This is one of my favorite recipes i make it all the time but reasently Ive wanted to make it 6 rolls instead of 12 to make them bigger do you know how long they should be cooked?
Hi Kole, we’re unsure of the exact bake time for 6 larger rolls. It will be a bit longer, but keep a close eye on them!
Do you think substitute margarine for butter to make it non-dairy?
Hi Aliza, that should be fine. For the dough, 1 TBS of oil could work in a pinch, or you can simply leave it out. You could also try using a vegan butter like the Earth Balance brand. Let us know if you try them!
First time! What tremendous success. Everyone wants more, lots more!
A great recipe. After freezing most of them I brought them out of the freezer and put them on a cookie sheet, put egg wash on the frozen buns and salt and put them in a hot over for a couple of min. and I have beautiful salted shiny buns
We loved this recipe! It’s easy to make and following the directions is especially important for bread recipes. ( in my personal experience). They were perfect. Thank you for another great recipe.
I enjoyed the recipe. I’m going to have to try making another batch and do a slightly longer bath in the baking soda because they didn’t quite have the pretzel flavor for me. (They had a moderate pretzely aftertaste, but tasted more like really good biscuits.) But even without the flavor, the texture was wonderful and they made great rolls for dinner and sandwiches. Nice crispy outside, super soft inside. I’ll just have to play around with them and see what works best. But a really fun, simple recipe.
Hello,
Do you have any idea what’s going wrong if the rolls come out very white on top? I do a good long baking soda bath(~35s) and make sure to spin/flip/bump the rolls around while they boil to get nice and coated, but they still came out 80% white on top. The parts on top that do brown, brown perfectly and so do the sides/bottom. I score butter and salt like you said and have made them several times, a few times they were almost perfect but often very white on top. They are fully cooked, good texture and taste. Maybe the rolls had too much/little residual flour coating? Too low in the oven? (I had it on a lower setting, convection bake). Maybe the temperature was a little too low/high? They’re so good, just wanted to make them perfect. Thanks
Hi Steve, is the white you’re talking about around the scored marks you made? See my pretzel knots for example. You’ll notice they’re white where the dough expanded after being shaped. The baking soda didn’t really hit those sections of dough (like where you scored your dough), so they don’t brown as much in those spots while baking. (They expanded after the baking soda bath.) If, overall, the rolls aren’t browning, I would extend the baking soda boil to 35 seconds. And increase the bake time.
I’m normally good at bread recipes, but this one was tough for me to get down. It was constantly sticky, so I kept having to add flour at different parts. That was operator error and not recipe error.
My ENTIRE family gave it a 10/10 and a “would make again.” Thanks Sally!
It would be nice if you give the Nutrition Facts for you recipes I do like your recipes, I m on low potassium
Hi Elfriede, We don’t usually include nutrition information as it can vary between different brands of the same ingredients. Plus, many recipes have ingredient substitutions or optional ingredients listed. However, there are many handy online calculators where you can plug in and customize your exact ingredients/brands. Readers have found this one especially helpful: https://www.verywellfit.com/recipe-nutrition-analyzer-4157076
These came out perfect! I’m planning on using them with pulled pork tonight but couldn’t wait to try one. They’re delicious!
I love your soft pretzels and soft pretzel bites, so I’m excited to try this.
What size rolls are these? Dinner rolls or burger/sandwich size?
Hi Kari, we’ve used these buns for sandwiches and burgers before. You can shape them to your desired size. Hope you enjoy them!
I made pretzel bites with your last pretzel recipe and they were so good. I definitely want to make these rolls. I’m looking to make them hamburger size. I’m wondering if you might be able to tell me how many grams each piece of dough should be for that.
You can definitely use this roll to make hamburger buns. You can shape them to your desired size – we’re unsure of the exact weight.
This recipe was very fun and surprisingly easy. The rolls tasted great, but were a bit misshapen and hard to handle once they were boiled. It was really hard to cut the slits into the top.
They didn’t have a metallic taste but did I boil them too long?
Or maybe over-kneeded.
I also used old baking soda….
Making for New Years brunch – second time making , fingers crossed
The rolls are good, BUT I had to slice the bottoms off and discard. DO NOT place wet rolls on parchment paper. The paper sticks while baking and is IMPOSSIBLE to remove !!!!
Super easy and awesome directions. I will reduce baking and rising time amd add some more salt. Thanks so much, I will be making again!
Wow! I made these with Caputo gluten free flour which makes killer pizza crusts. I followed the recipe exactly except for the flour choice and made them hamburger bun size. Time was exactly 22 minutes in my oven. These came out perfect! Thank you!
Can this recipe be used to make hot dog buns?
Can’t see why not! Let us know if you give it a try.
Picture perfect and soooo good! I followed the recipe to a T and they turned out beautifully. Second time making them, my hubs loves sliders for lunch. Repeat recipe, for sure!
Did you use an eggwash on yours? Mine didnt acheive that shine though they were delicious.
Hi Kaleah, We are glad you enjoyed these! Did you skip the baking soda bath? That is what gives the pretzel rolls the deepen the golden brown color on the exterior.
Can you wait up to 24 hours to bake after the baking soda bath like you can with your Soft Pretzel Bite recipe?
Do you think these would work if I made them larger? Kind of braided and then made into a circle?
Hi Ann, yes, you can make the rolls a bit larger — or you may wish to follow this pretzel knots recipe instead!
Delicious! Except I reduced the water to 310g for a 62% hydration dough to be easier to work with. I used General Mills all trumps bromated flour which has diastatic malt in it. They browned beautifully! My first ever time making pretzel rolls. Phenomenal. Thank you for the recipe!
Home run!
Hi Sally, I made these yesterday. Im an intermediate-beginner baking things like pizza crusts, simple breads, bagels, etc. For the most part I found these really easy to make but when I baked them, they ended up a LOT more white on top then in your pictures, a few were picture perfect but most were more white on top then brown, or at least 50/50. I’m not quite sure what went wrong, maybe scored too much/little? I also had no coarse salt so used pink sea salt and sesame seeds for topping. Could that have had an effect? Shape wise they were pretty perfect, round and fluffy and they still tasted good. What do you think? Thanks for the recipe and your great site, I’ve also made a few batches of your everything bagels – those were perfect!
Hi Stephen! A lot of that golden brown color comes from the baking soda bath – make sure the rolls are fully submerged when completing that step – you may need to flip/stir them around a bit.
When do you add the yeast and water to the dough?
Hi Kenzie, see step 1 — you want to start with the yeast and water in the mixing bowl, and then add the other ingredients in the order listed in remainder of the step.
Hi, I made these and they turned out perfect in texture and color, but a little bit flavorless on the inside. Should I have added more salt, because I used about 3.75 cups of flour?
Hi Elizabeth, you could certainly add more salt if you found the centers flavorless. You could even add a little garlic powder, Italian seasoning blend, or your favorite dried herbs.
Will these hold up to a burger and fixings, or are they intended to be fluffier? I’ve been looking for a good pretzel burger bun recipe.
Hi Jen, we’ve used these buns for sandwiches and burgers before. Hope you enjoy them!